Can You Build an Artificial Sun for Your Next Film Shoot?

Credit: DIY Perks

January 13, 2021

Every filmmaker wants to create realistic sunlight effects on their projects. Does this YouTuber have the answer?

Creating a realistic sunlight effect on a budget is the dream of many
independent filmmakers. While there are powerful units like 12K HMI’s
that larger productions use to mimic sunlight, they require a truck, a
generator, and a crew, and even then don’t always perfectly create that
special feeling of daylight.

This YouTuber, DIY Perks, has laid out a (somewhat) affordable system
for creating exceptionally realistic daylight. Intended for a winter
mood lift, he suggests this might also work for filmmakers. Will it?
Let’s find out.

First off, what he is proposing is broken into a few key steps.

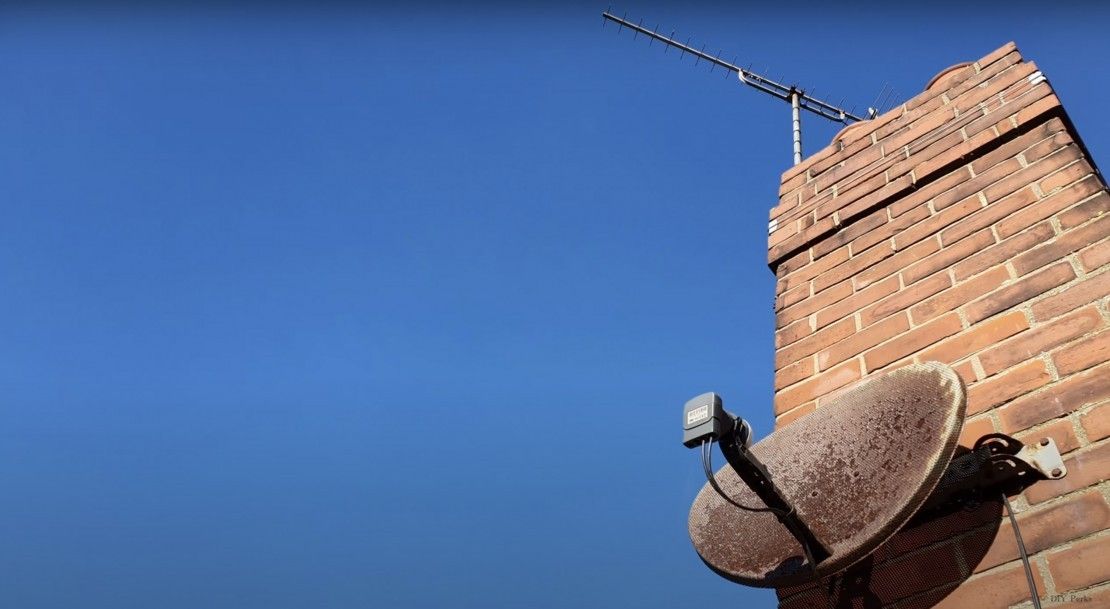
1. Source a parabolic dish and line it with reflective tape.

So, the first step is to acquire a parabolic dish. This seems hard, but
it really isn’t; basically, every satellite dish in the history of
satellite TV will work.

You can find these used in a variety of online marketplaces for really
not much money at all. Since you don’t need it in working condition, you
really have your pick. Be sure to sand off any rust, since we want the
smoothest surface possible. If you don’t have a sander or room to work,
you can find dishes that aren’t rusty to begin with.

You then coat that with mirror tape to create a smooth surface. This is
again very inexpensive, and there are a host of options online.

It’s important to use tape instead of sheets since you are covering a
dish, not a flat surface, and that is more complicated. It’s easier with
tape to allow gentle overlapping and trim pieces to create a curved
surface.

Credit: DIY Perks

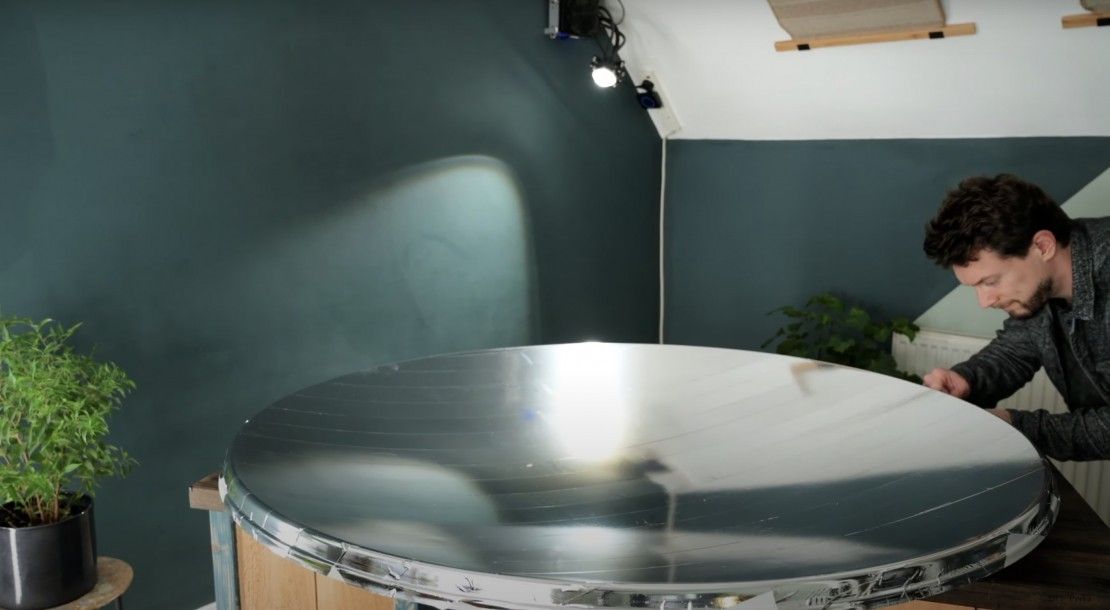
Why are you doing that? You are going to point a light towards it, and
that parabolic dish, which is now a mirror reflector, is going to
collimate the light so it runs more parallel.

Since the sun is millions of miles away, by the time its light gets to
us, it’s very close to parallel. When you are close to a light source,
its light radiates out in all directions. If you want to get your light
to feel like sunlight, you need it to be parallel.

Credit: DIY Perks

The easiest way to check this is how much your shadow size changes when
you move closer to your shadow. If you stand outside on a sunny day, you
can move your hand to the ground and up to the top of your reach and
your shadow size won’t change much at all. Do the same with your lamp
inside and you’ll see your shadows change dramatically in size.

That has to do with how much “spread” there is in the light rays.
Collimating the light with the reflector makes them more parallel, and
closer to sunlight.

2. Mount an LED source to the dish

One of the nifty things about using a satellite dish is that it will
have an arm attached to it that is supposed to have a receiver at the
focal point of the parabola to receive the radio signal.

By taking off that receiver, if it’s even still there, and mounting a
light in that place instead, you can shine a light into the parabola
from the focal point, which should focus the light such that all the
light rays are traveling in parallel to each other.

Credit: DIY Perks

In the video, this works amazingly well, and we have to admit it is
impressive to see how little shadow size change there is in the light
this unit creates.

We have to be honest, though, and say we would likely recommend
purchasing a prebuilt powerful LED to put in that position, maybe even
something that could be mounted into place. We could see bolting on a
Bowens or barn door mount to the dish arm to put a light there, though
remember, the dish is the heavier object, so you should mount that onto
the stand. If you try to hang a satellite dish off the front of a light
you are going to regret it.

3. Put a blue light scattering diffuser between the source and the subject.

Here is the real kicker. The sky is blue because of Rayleigh scattering,
which is a physical phenomenon that is a result of all the particles in
the air scattering the light as it goes through it. It makes the
sunlight feel yellower and the sky bluer.

It’s the reason why “sunlight” looks yellow to your eye if you look
towards the sun (don’t ever look right at the sun), and the sky around
it looks blue, even though daylight itself is 6500°K or even bluer.

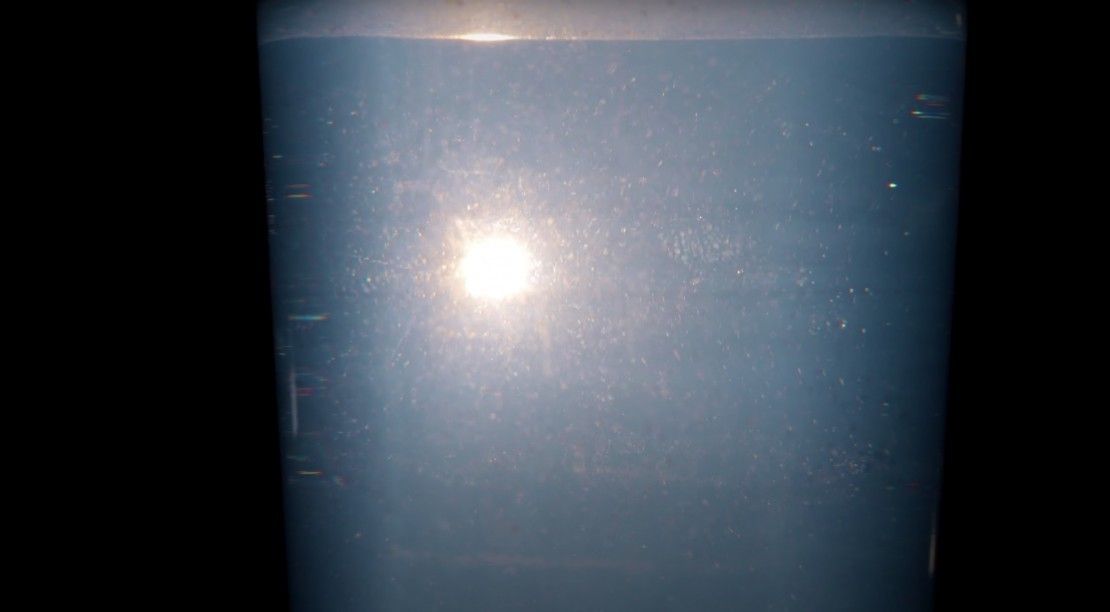
To recreate that, DIY Perks builds a very nifty water tank that suspends
soap in it, using the soap particles to recreate a similar scattering
effect. Amazingly, shining the light through it really does look quite a
bit like sunlight. 

So, will that work for filmmakers?

This first thing to remember is humans have a deep, instinctual
relationship with sunlight. Humans evolved for millions of years with
both sunlight (a far, blue source) and fire (a close, red source) as our
primary light sources, and it’s hard-wired into us to understand how
both work. One of the reasons bad lighting will often look bad is
because it’s trying to imitate a source but not doing it properly. It
causes deep instinctive bells and whistles to go off that tells us
something is wrong.

In one way, this is an amazing set of hacks for a filmmaker. By
analyzing all the important aspects of sunlight and mimicking them, it
should make recreating daylight scenes on a budget easier.

One key to remember is that light will still obey something like the
inverse square law (even lasers have some form of dropoff), where light
drops off faster the closer it is to the source, so we recommend placing
the units as far away from your scene as you can. The inverse square
law is why you can walk up a mountain and the light doesn’t get any
brighter, even though you are getting a mile closer to the sun; because
when you are that far away from the source it doesn’t change much.

But if you walk even 5 feet closer to a bedside lamp it goes much
brighter. Light drops off faster the closer you are to the unit. You’ll
need space to make this gag really work.

Credit: DIY Perks

Where we think this might not work as well for filmmakers is in two
areas, both of which can be overcome in certain circumstances but need
to be thought about.

The first is flexibility. These home-built units just don’t seem durable
enough to continually pack up in your truck, drive to a set, and set
up. If you are building a permanent set in your garage for a YouTube
show and want to have a cool window effect, this could be an amazing
window effect to have shining through your window on a permanent basis.
But moving it around constantly doesn’t seem doable. It could be
interesting if someone wanted to make a direct to factor connection with
a satellite dish manufacturer and convert them to cinema-use builds
with robust mounts and connectors, but the DIY units won’t likely hold
up.

The second, bigger issue is coverage area. Because the light is
collimated, its coverage area will be relatively small. Parallel light
doesn’t spread, after all, making this very spotty. As you can see in
the video, it looks like you’ll need a unit for every single window.
Again, if you are building a permanent set installation we could totally
see putting this up on every window in a “set it and forget it”
fashion, but putting 20 of these on your truck in order to light even
the simplest of location shoots would be a lot of space on the truck.

I do remember in the 80s growing up with our neighbors (we lived in the
woods) having giant satellite dishes that must have been 8 feet across.
We haven’t seen those since the 90s, since satellite tech presumably got
better, but they must be out there somewhere. If one of those could be
purchased used, you could maybe get a pretty wide coverage area out of
it. 

The blue light scattering diffuser is interesting since, at least in
this video, it does clearly affect the light in a way that most paper
diffusers just don’t. Again, for a permanent install, building something
like the aquarium system seems doable, but we would love to see
something more durable, with baby pins to put on a tripod, that we could
stick on the truck and bring with us to set. We would also love to see
more testing to see if there is anything non-liquid we could use to
create a similar effect. While we’re fellow users of black soap, dragging around tanks of liquid would be best avoided if possible, but maybe worth it if not.

We do think it’s a very cool idea, and honestly, we’re tempted to try it
for fun, using a movie light in place of building an LED from scratch.
If it takes off as a concept, we hope someone in the movie space will
make more flexible, reusable systems for both the parabolic reflector
and the blue light scattering diffuser.

As we head into the long winter months continuing to be trapped inside,
if we had space we’d want to build it just so we can have that “summer
morning breakfast” feeling instead of the “winter in a dark tunnel”
breakfast feeling we have as we eat our eggs before the sun comes up.
For that alone, we’re into this video.

Netflix Swoops in to Finance the Completion of Orson Welles’ Final Film

Orson Welles - F for Fake
The streaming behemoth will distribute Welles’ ‘The Other Side of the Wind’ after editing has been completed based on the director’s notes.

Almost 2,900 backers stepped up to fund an Indiegogo campaign launched in May 2015 to complete Orson Welles’ final film, The Other Side of the Wind. Although the campaign raised over $400,000, that amount fell well short of the campaign’s revised goal of $1 million (down from the original $2 million). Even with producers Frank Marshall and Peter Bogdonovich on board, the crowdfunding campaign wasn’t able to get the film across the finish line.

Since the campaign, Marshall, Bogdonovich and fellow producer Filip Jan Rymsza have been relatively quiet about the project, although rumors started almost a year ago that Netflix was circling the film with the possibility of also creating a full-length documentary about the making of the film.

Now, Netflix has officially announced that the company has picked up the rights to The Other Side of the Wind, and will provide financing to complete the edit. Marshall served as line producer on the film in the 1970s, and Bogdonovich appears in the film, so these two filmmakers have personal stakes to finish this film beyond their admiration for Welles.

“Like so many others who grew up worshipping the craft and vision of Orson Welles, this is a dream come true,” said Ted Sarandos, Netflix Chief Content Officer, in a statement released by the company. “The promise of being able to bring to the world this unfinished work of Welles with his true artistic intention intact, is a point of pride for me and for Netflix. Cinephiles and film enthusiasts around the world will experience the magic of Orson Welles once again or for the very first time.”

Marshall is a little beside himself with the realization of this news. “I can’t quite believe it, but after 40 years of trying, I am so very grateful for the passion and perseverance from Netflix that has enabled us to, at long last, finally get into the cutting room to finish Orson’s last picture,” said Marshall in the statement.

Film negatives have been shipped from Paris to Los Angeles for scanning, and editing will adhere to notes that Welles left behind in several notebooks. Not surprisingly, Netflix has not announced a release date, so stay tuned to find out when you can see Welles’ last film.

4 Cinematography Tricks for Shooting Beauty

As a cinematographer, how can you make your subject’s beauty really pop?

Fashion and beauty photography/cinematography is big business, so it’d do you good to learn some tricks of the trade that’ll help you really capture the beauty of your subjects. In the video below, Director/DP Matthew Rosen shares his approach to shooting beauty, including how to light a scene and how to achieve gorgeous visual effects in-camera that’ll make your subject really stand out. Check it out below:

Beauty is in the eye of the beholder, even when you’re a cinematographer. There are countless ways to capture “beauty,” but Rosen’s approach is what many would consider to be more traditional: soft, even lighting, delicate flares, etc.

So if that’s what you’re after, here are the four tricks he mentions in the video:

  • Lighting: Rosen uses a single backlight and two bounces on either side of his subject. This produces a hair light, as well as nice, even lighting on the subject’s face.
  • Eye light: Eye lights are crucial in beauty photography/cinematography, because, duh, eyes are beautiful and can express a lot of emotion, so you really need to ensure that you capture that in your subject. Here’s a tutorial dedicated to showing you how to master the eye light.
Rosen’s setup for creating flares in-camera
  • Flares: This technique gets kind of a bad rap because of its overuse (thanks J.J.), but if used sparingly and intentionally, flares can give your shot that delicate softness you’re looking for. Rosen creates his traveling flares in-camera using a “flashing” technique. If you set up a row of lights and move them along a track with finger flags that cut the light intermittently, you will get these kinds of flares.
  • Vignette: Creating a vignette can certainly be done in post, but if you want to do it in-camera, Rosen uses different kinds of glass objects set in front of the camera to pull off the effect.

10 Things to Think about When Choosing the Right LED for Your Project

Choosing the Right LED

This will help take the guesswork out of buying LEDs.

If you don’t know much about lighting, shopping around for LEDs might seem like an exercise in futility, because you don’t really know what to look for (or look out for). But Caleb Pike of DSLR Video Shooter shares 10 tips in the video below on what to look for in an LED lighting unit, from price to brightness and everything in between.

So, here are the things Pike says you should consider before purchasing an LED:

  • Your budget
  • How do you plan on using your LEDs?
  • Output/luminance (the number of LED bulbs/chips/diodes doesn’t necessarily determine the light’s output)
  • CRI (the higher the better)
  • Color temperature
  • Power options (Does it only run on batteries or can it be plugged in?)
  • Beam angle
  • Multi-chip or single-chip?
  • Edge color distortion
  • Extra features (LCD screens, battery life indicators, bi-color, dimmers, etc.)

Now that you know what to look for, Pike shares a bunch of LED lights that you might want to consider.

2016 was a lot of things, but it was a fantastic year for cinema in Hollywood

Dear 2016, Thanks for the Great Films

2016 has been an interesting year, especially for movies.

It’s finally here, the last day of 2016! While some of us may celebrate with shots and chanting “Ding dong, the witch is dead,” some may find it appropriate to look back on a truly spectacular year in films, especially those coming from the indie sector. Inevitably, video essayists and casual videomakers, like Max Shishkin, Fernando Andrés, and Ben Zuk, have created end-of-year supercuts and mashups of all of 2016’s films, so, we chose a few of our favorites as a fitting tribute to a year that we hate to see go, but love to watch leave.

It’s heartening to see filmmakers in 2016 continuing to push boundaries and take chances with their projects. Barry Jenkins told a story most feared to tell in Moonlight, the Daniels managed to sell a film about a farting corpse, and Nicolas Winding Refn and DP Natasha Braier showed us some of the most spectacular cinematography in Neon Demon. Hopefully 2017 will show us the same spirit.

What were your favorite films of 2016?


See a 2016 Year-in-Review coverage.

Is Wedding Video A Must or a Maybe?

The Knot

Before we got into filming weddings, we had the same connotations of this industry as the next person. My most vivid memory was at a friend’s wedding where I was witness to the stereotypical video dude with the giant shoulder cam, on-camera light, and cables hanging every which way. He was paid to stand in the back of the room and record every second from start to finish.

My first thought was, “are they even going to watch this?”

So, is it Necessary?

To answer the question, I’ll be completely honest. No, a wedding videographer is not necessary. Gasp!

It must be strange hearing that, seeing as this is what we do for a living. The truth is though, having a keepsake like a wedding film just isn’t a priority for everyone. You may be more focused on creating a truly magical evening for yourselves and for your guests, or maybe you want to spend extra effort on organizing an amazing cart of delicious treats for your foodies in the crowd.

If that’s the case, you’re probably less likely to be as concerned with capturing memories as you are in experiencing them with everyone. That’s quite alright, because everyone is different, and we all have our priorities.

Should You Hire a Videographer?

One of the biggest regrets I hear from brides is that they didn’t hire a wedding videographer. Sure sure, I’m biased, but take a look at this article, “Not Hiring a Wedding Videographer is a Bride’s Biggest Regret” or this one, “…Big Mistake. Big. HUGE.”

“How did I move in my dress? How did I sound saying my vows? What words did I actually say? … Yep, my main regret is not having any moving footage of my day.”   -Becky, Rock My Wedding

The fact is, it’s next to impossible for you to remember all of the little details, and even some of the big ones that happened that day. In talking with a potential client the other week, I asked them, “Why is having a wedding film important to you?” His answer made total sense and it was pretty refreshing to know that what we do clicks with our fans. He said that after watching our films, he felt as though he knew these people.

“Watching them was an experience, it was immersive.”

Our goal when producing a wedding film is to make it as emotionally engaging as humanly possible. This is what we strive for each and every time. Visit our brendandayfilms Samples section to see some examples.

In Summary

If you’re on the fence about it, or you’re not sure you want to spend the money, I would definitely still recommend it. Try looking at it like an insurance policy. You may not watch it all the time, but it’s there if you need it.

A beautiful and professional photo can do wonders, but it won’t let you listen to your own voice reciting your vows. It won’t bring you back into the conversation you were having with your bridesmaids as you got your hair and makeup done together. It won’t let you hear the exchanges between your grandparents and parents during cocktail hour.

A film will do that.

You may be thinking wedding photos and a video are overkill, but trust us, you will want both. Don’t just take our word for it — listen to feedback from these Knotties.

“The only regret I have about our wedding is not having a videographer. The day goes by so quickly — you really miss so much of it. I look back now and wish I would have spent the money for it.” -Vicky Harrison

“I was really worried that I might regret not having a videographer — not only to capture my fiance and me, but mostly our family members. I know it’s kind of morbid, but I know they won’t be around forever and I wanted to capture their voices and mannerisms.”

rmfriedman

“While we are very pleased with our photographer, I’m now starting to have second thoughts about not having a videographer. I guess there’s nothing like having a video to capture the details, people’s faces/expressions, our vows — things that I might miss during the day as a busy bride and that don’t necessarily get captured in even the best quality photos.”

caramels03

“DO IT!!!!! I promise you will not regret spending the money. You may not think you want to relive every minute, but after the day you have been meticulously planning for months flies by in what feels like seconds, you will be desperate for a way to remember it!”

rachaelj99

“I just got married in June, and we had both a photographer and a videographer. I am so, so, so thankful that we ended up going with the video. It was something we almost cut to save money, but it was so worth it! When we got the pictures back, there were many guests and moments that were missed — and thankfully were caught by the video. I hate being videotaped, but I never even noticed him throughout the day.”

megc2

“I’m definitely planning on hiring a videographer. I want to be able to see fiance’s and my expressions when we say our vows. I want to be able to hear how we say them — and I just want to see everyone have a ball at our reception. And come 40 years from now when DVDs and blu-rays are old-school, I still want to be able to watch us on our big day.”

“I did not think I would be so excited to watch our wedding video, but the day went by so quickly! I want to see our ceremony and cocktail hour, which I missed. Though I may only watch it a few times, I think it was worth the money.”

foozzle

Fill Out the Form Below for more information on all of our services.

Cheers!

Your Name (required)

Your Email (required)

Date and Location of your Event

Information about your wedding

captcha
please fill in the captcha section

‘Moonlight’ is the Big Winner at IFP’s 2016 Gotham Awards, Takes Home 4 Awards


FP’s 26th annual Gotham Independent Film Awards ceremony kicks off tonight, and this is the place to come for our coverage of the nominees as well as up-to-date information on all the winners.

Here are the nominees and winners (in bold) for each category:
Best Feature

Certain Women — Kelly Reichardt, director; Neil Kopp, Vincent Savino, Anish Savjani, producers (IFC Films)
Everybody Wants Some!! — Richard Linklater, director; Megan Ellison, Ginger Sledge, Richard Linklater, producers (Paramount Pictures)
Manchester by the Sea — Kenneth Lonergan, director; Kimberly Steward, Matt Damon, Chris Moore, Lauren Beck, Kevin J. Walsh, producers (Amazon Studios)
Moonlight — Barry Jenkins, director; Adele Romanski, Dede Gardner, Jeremy Kleiner, producers (A24) [WINNER]
Paterson — Jim Jarmusch, director; Joshua Astrachan, Carter Logan, producers (Amazon Studios)

Want to know more about the nominees for Best Feature?

In ‘Manchester by the Sea,’ Waves of Grief Punctuate the Year’s Most Tragic Performances
‘Film is a Gateway to Understanding People’: Kelly Reichardt on the Immersive Filmmaking of ‘Certain Women’
‘Moonlight’: Barry Jenkins on Why the Exquisite Film Nearly Killed Him

The Hardest Parts About Producing Jim Jarmusch’s ‘Paterson’? The Bus and That Very Special Dog

‘Moonlight’

Best Documentary

Cameraperson — Kirsten Johnson, director; Marilyn Ness, producer (Janus Films)
I Am Not Your Negro — Raoul Peck, director; Rémi Grellety, Raoul Peck, Hébert Peck, producers (Magnolia Pictures, Independent Lens)
O.J.: Made in America — Ezra Edelman, director; Caroline Waterlow, Ezra Edelman, Tamara Rosenberg, Nina Krstic, Deirdre Fenton, Erin Leyden, producers (ESPN Films) [WINNER]
Tower — Keith Maitland, director; Keith Maitland, Megan Gilbride, Susan Thomson, producers (Kino Lorber, Independent Lens)
Weiner — Josh Kriegman, Elyse Steinberg, directors and producers (Sundance Selects and Showtime Documentary Films)

Want to know more about the nominees for Best Documentary?

‘Search for Revelations’: Invaluable Cinematography Advice from DP Kirsten Johnson

‘Cameraperson’

Bingham Ray Breakthrough Director Award

Robert Eggers — The Witch (A24)
Anna Rose Holmer — The Fits (Oscilloscope Laboratories)
Daniel Kwan and Daniel Scheinert — Swiss Army Man (A24)
Trey Edward Shults — Krisha (A24) [WINNER]
Richard Tanne — Southside with You (Roadside Attractions and Miramax)

Want to know more about the films directed by the Bingham Ray Award?

How Mark Korven Avoided the Temptations of Temp Music to Score ‘The Witch’
Why is ‘The Witch’ So Terrifying?
‘Bad Ideas No One Else Wants to Make’: Meet ‘Swiss Army Man’ Co-Directors DANIELS
‘The Fits’: Why Oscilloscope Took a Leap of Faith on the Low-Budget Sundance Hit

‘The Witch’

Best Screenplay

Hell or High Water — Taylor Sheridan (CBS Films)
Love & Friendship — Whit Stillman (Amazon Studios)
Manchester by the Sea — Kenneth Lonergan (Amazon Studios)
Moonlight — Story by Tarell Alvin McCraney; Screenplay by Barry Jenkins (A24) [WINNER]
Paterson — Jim Jarmusch (Amazon Studios)

Want to know more about the Best Screenplay nominees?

Read 20 Oscar-Hopeful Screenplays: ‘Loving,’ ‘Manchester by the Sea,’ and More

Best Actor

Casey Affleck — Manchester by the Sea (Amazon Studios) [WINNER]
Jeff Bridges — Hell or High Water (CBS Films)
Adam Driver — Paterson (Amazon Studios)
Joel Edgerton — Loving (Focus Features)
Craig Robinson — Morris from America (A24)

Adam Driver in ‘Paterson’
Best Actress

Kate Beckinsale — Love & Friendship (Amazon Studios)
Annette Bening — 20th Century Women (A24)
Isabelle Huppert — Elle (Sony Pictures Classics) [WINNER]
Ruth Negga — Loving (Focus Features)
Natalie Portman — Jackie (Fox Searchlight Pictures)

Want to read the screenplay for Jackie, Elle, and several others?

Download ‘Jackie,’ ‘Birth of a Nation’ and More Oscar-Hopeful Screenplays for Free

Breakthrough Actor

Lily Gladstone — Certain Women (IFC Films)
Lucas Hedges — Manchester by the Sea (Amazon Studios)
Royalty Hightower — The Fits (Oscilloscope Laboratories)
Sasha Lane — American Honey (A24)
Anya Taylor-Joy — The Witch (A24) [WINNER]

Royalty Hightower in ‘The Fits’
Breakthrough Series—Long Form

Crazy Ex-Girlfriend— Rachel Bloom & Aline Brosh McKenna, creators; Marc Webb, Rachel Bloom, Aline Brosh McKenna, Erin Ehrlich, executive producers (The CW) [WINNER]
The Girlfriend Experience — Lodge Kerrigan, Amy Seimetz, creators; Steven Soderbergh, Philip Fleischman, Amy Seimetz, Lodge Kerrigan, Jeff Cuban, Gary Marcus, executive producers (Starz)
Horace and Pete — Louis C.K., creator; M. Blair Breard, Dave Becky, Vernon Chatman, Dino Stamatopoulos, executive producers (louisck.net)
Marvel’s Jessica Jones — Melissa Rosenberg, creator; Melissa Rosenberg, Liz Friedman, Alan Fine, Stan Lee, Joe Quesada, Dan Buckley, Jim Chory, Jeph Loeb, Howard Klein, executive producers (Netflix)
Master of None — Aziz Ansari and Alan Yang, creators; Michael Schur, David Miner, Dave Becky, executive producers (Netflix)

Breakthrough Series—Short Form

The Gay and Wondrous Life of Caleb Gallo — Brian Jordan Alvarez, creator (YouTube)
Her Story — Jen Richards and Laura Zak, creators (herstoryshow.com) [WINNER]
The Movement — Darnell Moore, Host (Mic.com)
Sitting in Bathrooms with Trans People — Dylan Marron, creator (Seriously.TV)
Surviving — Reagan Gomez, creator (YouTube)

Special Jury Award for Ensemble Performance

Moonlight — Mahershala Ali, Naomie Harris, Alex Hibbert, André Holland, Jharrel Jerome, Janelle Monáe, Jaden Piner, Trevante Rhodes, Ashton Sanders [WINNER]

Gotham Audience Award

Moonlight [WINNER]

MoVi Pro is the Next Evolution in Stabilized Motion

The new MoVi Pro is a more sophisticated, battle-tested design.

When Freefly first released the test film for the MoVi camera stabilizing rig three years ago, it was an exciting moment for indie filmmakers. Shots that previously required expensive equipment were now possible on a reasonable budget. Some shots that were previously impossible were now almost easy.

This looks like a major step forward for stabilizers.

But the system—and its many, many copycats—suffered from problems that often plague first-generation products. It could take a long time to get the calibration properly set up. Restart times on battery swaps were time-sucks on set. Cabling was messy and prone to getting snagged, throwing off your shot, or exposure to the elements. The MoVi was great, but it at times felt more like a beta than a final release.

Today, Freefly has finally released the next generation: the MoVi Pro.

Now, the company that first popularized gimbal stabilization appears to be the company that is going to help it grow up.

Freefly is clearly driven by shooters and has had a close relationship with its customers out in the field; the evolution of the design really shows. For the first time, MoVi looks clean and well-integrated.
MoVi Internal Cable RoutingCredit: Freefly

By switching to internal cable routing, the new MoVi Pro not only looks like a designed device (and not something rigged DIY), but it’s also less likely to snag on nearby objects when executing a complicated move. It’s safer from inclement weather, and it’s going to be faster to set up.

The rig assembly comes with a built-in stand, making it easier for the operator to rest the MoVi.

To that end, the MoVi now offers a two-second boot time, so you won’t miss a shot waiting on the rig to boot. That feature might not matter much, however, since the system offers hot, swappable batteries; in theory, you could keep the stabilizer turned on all day and never need to boot up by swapping batteries live whenever one gets low.
MoVi ProCredit: Freefly

The Pro is also designed to offer camera and accessory power directly, so the only batteries you’ll need to worry about throughout the day are the MoVi Pro batteries.

In addition to power for camera and accessories, MoVi has worked to integrate RED Camera Protocol (RCP) for remote control of RED camera bodies. Even if your MoVi is on a drone in the air or at the end of a 20′ crane, you can change your RED camera settings, including checking playback, from the MoVi remote or the new MIMIC remote.
Credit: MoVi Pro

In order to expedite the rig setup, the Pro offers an auto-tune mode that is able to auto-calibrate as the camera setup changes. Time is money on set; time lost to calibrating a camera after a lens change is time you don’t get to spend shooting.

In a final, much-appreciated addition, the rig assembly comes with a built-in stand, making it easier for the operator to rest the MoVi when it’s not being put to dynamic use.
Built in stand for the MoVi ProCredit: Freefly

This looks like a major step forward for stabilizers, and one that is well positioned to keep Freefly ahead of the fierce competition in this space.

Packages for handheld or aerial work will come in around $6,500 and are expected to ship in mid-November. For more info or to order, head over to the Freefly site.
Tech specs

25.2V hot swappable MoVi Pro Batteries
Power Outputs: Camera D-Tap, Spine D-Tap, Tilt D-Tap, Tilt USB
Detailed info screen
Auto-tune mode for calibration
Custom designed direct drive brushless motors, twice as much torque as before
180° instant roll to go from hand held to TERO
Toad In The Hole Quick Release
Increased 30mm ring diameter
New MIMIC controller
Pro App
2 second boot time
60dB at 1Hz disturbance rejection
Built-in stand

Want to Be a Steadicam Operator? Start With These 5 Tips

There’s no better way to learn Steadicam than to practice, but you need to begin with the basics.

Steadicam operating is a true craft that can take a lifetime to master. I’ve been Steadicam operating for over seven years and I’m still always learning, honing, and practicing my technique.

With the advent of gimbals, Steadicams have taken a back seat for many of today’s filmmakers, but I believe they remain the right tool for the right job. Gimbals are new and exciting tech but not a full 360 solution. And while I think the future is a hybrid of the two, there is still a reason to understand the basics of flying and operating the Steadicam.

When I first started out, I read books, watched Youtube videos, and searched forums—but there just wasn’t enough out there for me to grasp the basic operating concepts. With the high cost of entry coupled with the specialized aspects of operating, Steadicams are one of those true craftsman skills that you just can’t learn completely online. That being said, I will share some basic tips here that will give you the fundamental understanding you need to get started. By no means will you be up and running with these tips, but hopefully this will inspire you to discover your own best path to flying.

“My first Steadicam, a Tiffen Pilot, had me strapped in velcro, which was weird, but totally enough.”

1. Know the parts

GPI PRO TITAN ARM
GPI Pro Titan Arm
The arm. For me, the arm is the heart of the Steadicam. The arm becomes an extension of your body, connection to the sled, and is the central stabilizer for all movements. The arm usually consists of two segments that are supported by springs. While they all do basically the same thing, arms vary in size, strength, and price.

Tiffen Steadicam M1 sled
The sled. The sled is the vessel that becomes one with the camera rig. Camera, matte box, follow focus, power, monitor, all become a part of the sled, much like a tripod. The sled consists of a top stage, arm, monitor, battery rack, and gimbal. Ultimately, the sled has to balance on the gimbal to achieve dynamic balance (which we will get into later). While the sled must be robust enough to carry up to 80 lbs., it must also have hairline precision.

Aliens M56 smartgun with Steadicam bodymount
The vest. The vest connects your body to the arm, which connects to the sled, which makes you look like one gigantic cyborg looking bad ass. In the beginning, when cameras were over 50 lbs., the vests were just as robust, but as cameras have gotten lighter, so has the tech on the vests. Ultimately, the vest allows the weight and momentum of the rig to be placed on the body which has lot more power than your arms. My first Steadicam, a Tiffen Pilot, had me strapped in velcro, which was weird, but totally enough.

2. Understand balance and drop time

There are three aspects that I find to be the most important when balancing a sled: dynamic balance, drop time, and horizon. But what does balancing a sled even mean? Well, the sled must be able to achieve a neutral balance at the point of the gimbal on the sled so that when there is lateral movement, the camera floats effortlessly. How does one achieve this?

First, you need to position the camera, power, monitor, accessories and gimbal position on the sled to achieve dynamic balance. Basically, you need to get the all the elements of the sled on the top and the bottom to be balanced with the adjustable gimbal. This is done with major and minor adjustments on the top stage and bottom stage.

Next, Drop time, which is the amount of time the sled will drop from horizontal to vertical on the gimbal. You place the sled on a solid, beefy baby to fine tune the gimbal post position on the arm. The goal is to get a drop time of about 3 seconds. This will allow the operator the best options for flying.

I know all of this is hard to visualize, but doing it and seeing it in real life will answer all your questions.
3. When flying, let the rig do the work

Flying the rig is actually quite simple. Strap the vest on, attach the arm to the vest, then throw the sled on the arm. Rest your hand on the gimbal arm, and with your other hand feather the gimbal grip.

My main advice for the beginner is to let the rig do the work. The initial intuition is to control the rig and fight the springs and movements. The Steadicam is an ingenious invention, but true control is built around allowing the rig to do the work.

I could write pages about the movements, but you probably won’t get it until you try it on. Flying a Steadicam is much like riding a bike. There is nothing better to help you understand it than to just go ahead and try it.
4. Be diligent about mastering your skills

The one thing I’ll say about Steadicam is that it’s a tool, and a tool is useless if you don’t know how to work it properly. Read this book,The Steadicam Operator’s Handbook. Find a mentor, like I did with one of the best steadicam ops I know, BJ McDonnell, who gave me my first lesson. Take a class. Develop the right habits. Then, practice forever.
5. Consider investing in gear

Steadicams are expensive, and the initial investment is always tremendous. The pro gear rigs can cost upwards of 80K, while the smaller ones can cost 1-2K. My first Steadicam was a Tiffen Pilot and, although that was a major purchase, I couldn’t fly anything bigger than DSLR. At the time it was fine, but as time went on, I upgraded to a Steadicam Zephyr. While the Zephyr can’t fly the big rigs, it can fly most of the cameras that I get jobs for with a max camera weight of 25 lbs.

There are a multitude of rigs out there and I’ll do a big review of those on No Film School. Like cameras, they all have their quirks like cameras but fundamentally they all do the same thing. Find the rig that you can afford and see if you even enjoy the process. Steadicam is not for everyone and its a big commitment. I find the steadicamforum.com a great resource for user reviews on all the rigs out there.

We don’t view the world in handheld. We see it in a balanced, dynamic, mobile perspective. The Steadicam enhances this perspective and creates a visual that is unique and special.

At about 16:00 in of this video, you can see me showing the basics of flying the rig.

Drone Captures Skier in the Dead of Night


Mattieu Bijasson is a freeride skier out of La Clusaz, France. He has competed all over Europe for the Freeride World Tour, and does not shy away from steep couloirs and big cliffs.

RELATED: Drone Footage That Will Make You Drool

Bijasson recently submitted a video to the Rise Of The Drones Film Festival. The winner of the contest receives 4000 euros and a DJI Inspire 1. In Bijasson’s edit, he shreds a sick line in complete darkness, the only light produced is bright green LED lights on his skis and poles.

Bijasson hucks cliffs, hurtles spines and double backflips off of booters, and films all of it in the middle of the night on a drone. Prepare to be mesmerized as this French shredder fearlessly rips down the mountain.
Courtesy of: Teton Gravity Research
These guys always kill it