Can You Build an Artificial Sun for Your Next Film Shoot?

Credit: DIY Perks

January 13, 2021

Every filmmaker wants to create realistic sunlight effects on their projects. Does this YouTuber have the answer?

Creating a realistic sunlight effect on a budget is the dream of many
independent filmmakers. While there are powerful units like 12K HMI’s
that larger productions use to mimic sunlight, they require a truck, a
generator, and a crew, and even then don’t always perfectly create that
special feeling of daylight.

This YouTuber, DIY Perks, has laid out a (somewhat) affordable system
for creating exceptionally realistic daylight. Intended for a winter
mood lift, he suggests this might also work for filmmakers. Will it?
Let’s find out.

First off, what he is proposing is broken into a few key steps.

1. Source a parabolic dish and line it with reflective tape.

So, the first step is to acquire a parabolic dish. This seems hard, but
it really isn’t; basically, every satellite dish in the history of
satellite TV will work.

You can find these used in a variety of online marketplaces for really
not much money at all. Since you don’t need it in working condition, you
really have your pick. Be sure to sand off any rust, since we want the
smoothest surface possible. If you don’t have a sander or room to work,
you can find dishes that aren’t rusty to begin with.
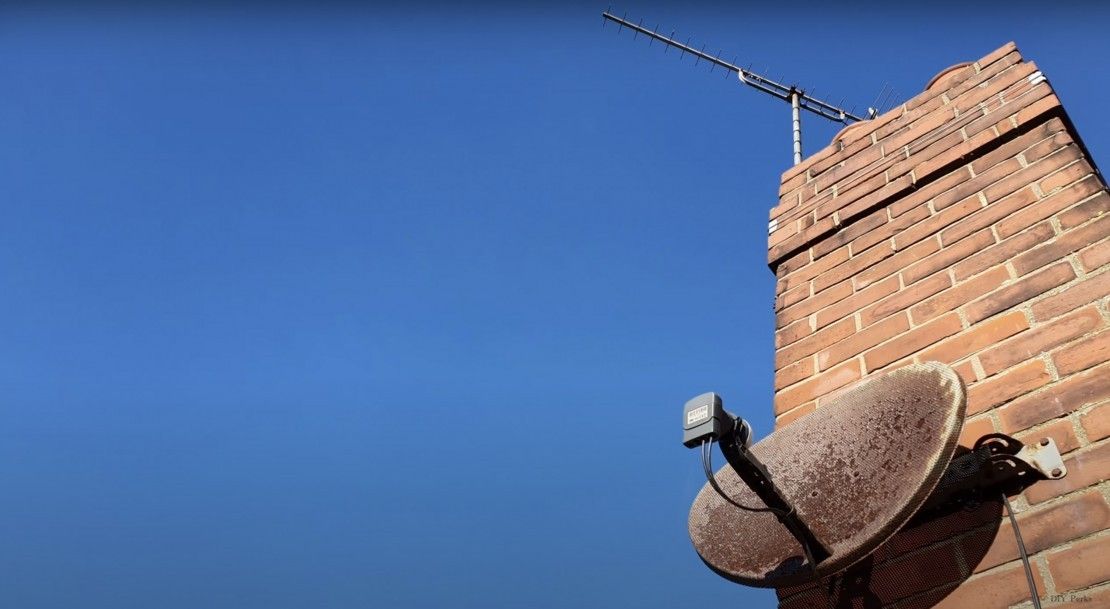
You then coat that with mirror tape to create a smooth surface. This is
again very inexpensive, and there are a host of options online.

It’s important to use tape instead of sheets since you are covering a
dish, not a flat surface, and that is more complicated. It’s easier with
tape to allow gentle overlapping and trim pieces to create a curved
surface.
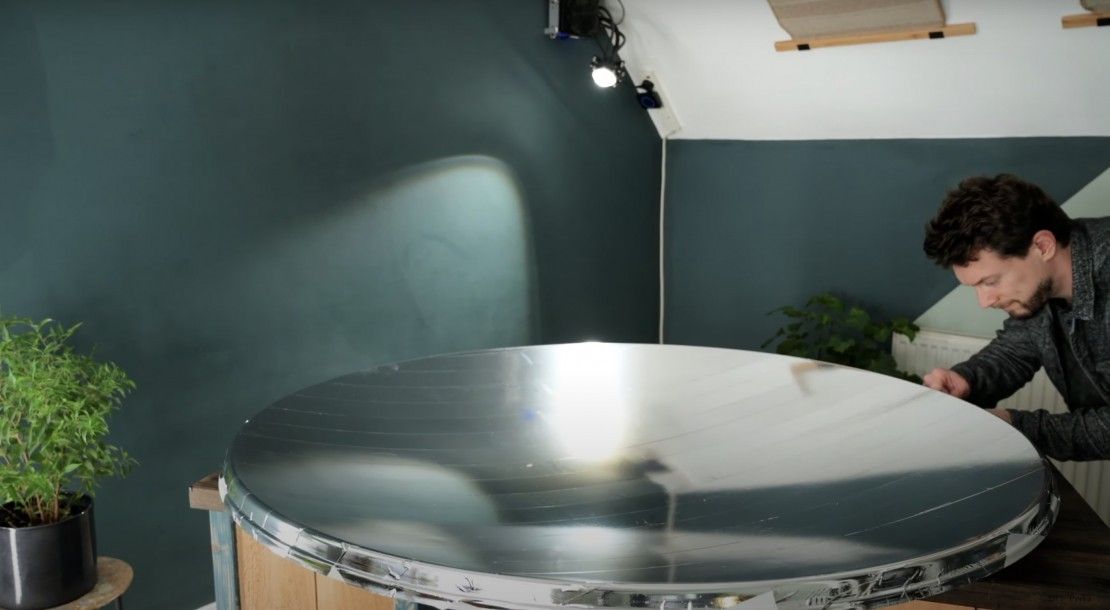
Credit: DIY Perks

Why are you doing that? You are going to point a light towards it, and
that parabolic dish, which is now a mirror reflector, is going to
collimate the light so it runs more parallel.

Since the sun is millions of miles away, by the time its light gets to
us, it’s very close to parallel. When you are close to a light source,
its light radiates out in all directions. If you want to get your light
to feel like sunlight, you need it to be parallel.
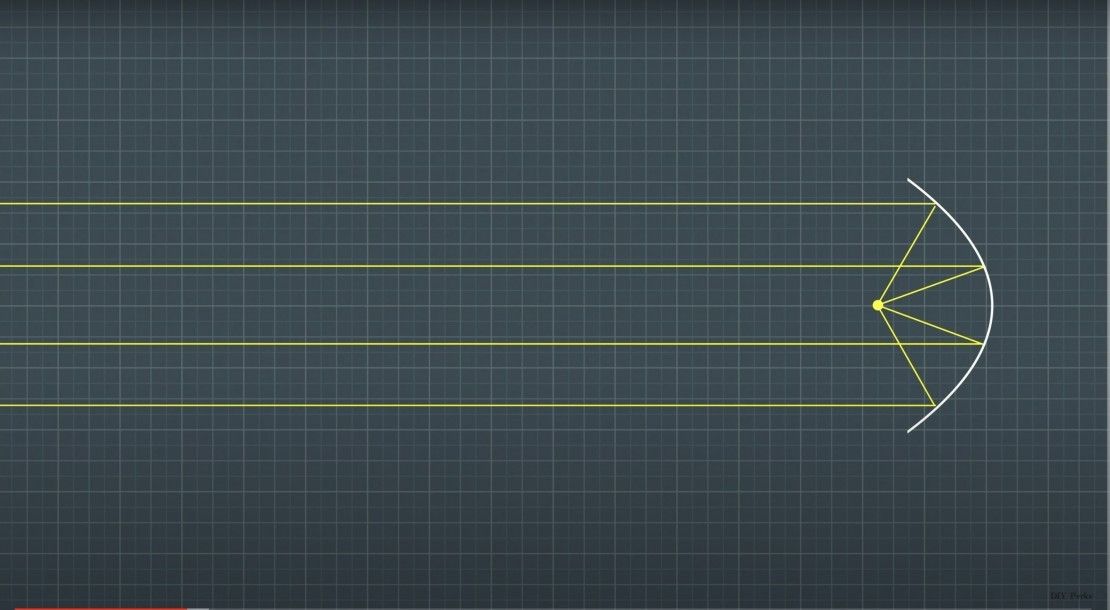
Credit: DIY Perks

The easiest way to check this is how much your shadow size changes when
you move closer to your shadow. If you stand outside on a sunny day, you
can move your hand to the ground and up to the top of your reach and
your shadow size won’t change much at all. Do the same with your lamp
inside and you’ll see your shadows change dramatically in size.

That has to do with how much “spread” there is in the light rays.
Collimating the light with the reflector makes them more parallel, and
closer to sunlight.

2. Mount an LED source to the dish

One of the nifty things about using a satellite dish is that it will
have an arm attached to it that is supposed to have a receiver at the
focal point of the parabola to receive the radio signal.

By taking off that receiver, if it’s even still there, and mounting a
light in that place instead, you can shine a light into the parabola
from the focal point, which should focus the light such that all the
light rays are traveling in parallel to each other.
Credit: DIY Perks

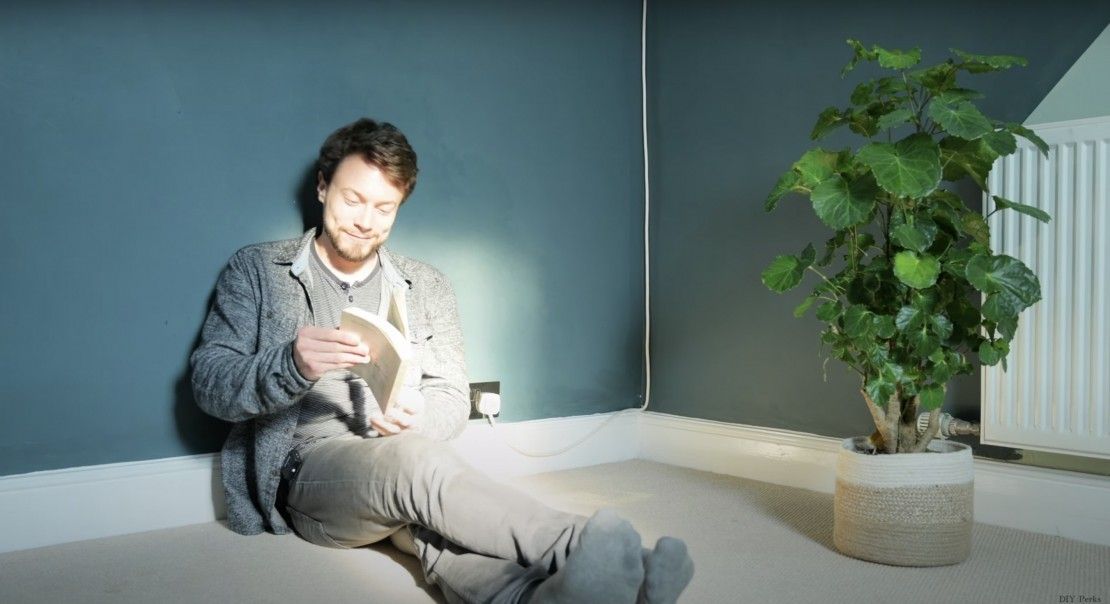
In the video, this works amazingly well, and we have to admit it is
impressive to see how little shadow size change there is in the light
this unit creates.

We have to be honest, though, and say we would likely recommend
purchasing a prebuilt powerful LED to put in that position, maybe even
something that could be mounted into place. We could see bolting on a
Bowens or barn door mount to the dish arm to put a light there, though
remember, the dish is the heavier object, so you should mount that onto
the stand. If you try to hang a satellite dish off the front of a light
you are going to regret it.

3. Put a blue light scattering diffuser between the source and the subject.

Here is the real kicker. The sky is blue because of Rayleigh scattering,
which is a physical phenomenon that is a result of all the particles in
the air scattering the light as it goes through it. It makes the
sunlight feel yellower and the sky bluer.

It’s the reason why “sunlight” looks yellow to your eye if you look
towards the sun (don’t ever look right at the sun), and the sky around
it looks blue, even though daylight itself is 6500°K or even bluer.
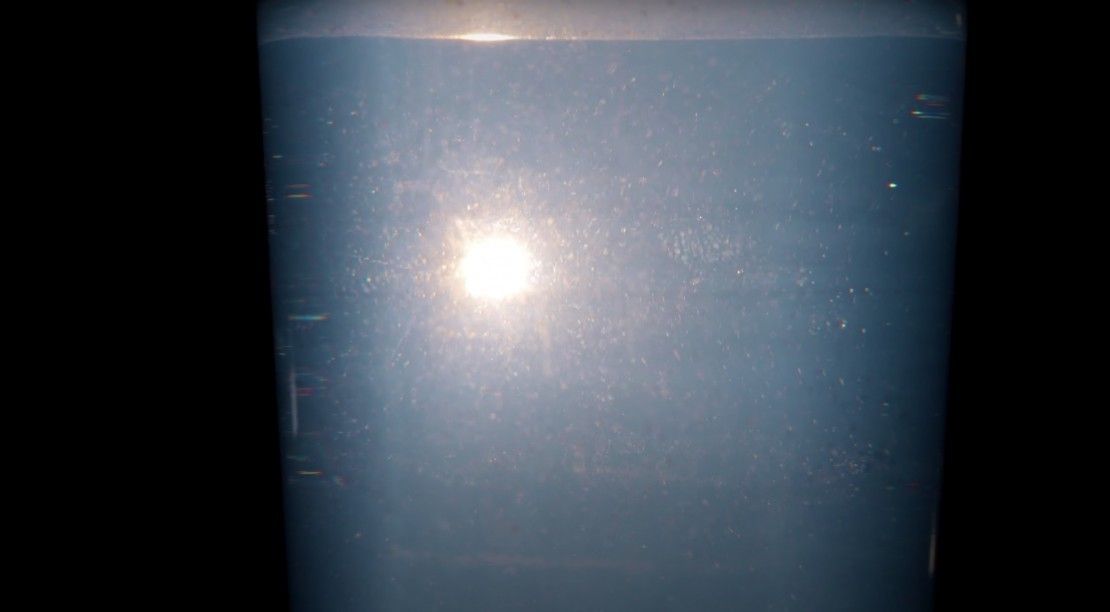
To recreate that, DIY Perks builds a very nifty water tank that suspends
soap in it, using the soap particles to recreate a similar scattering
effect. Amazingly, shining the light through it really does look quite a
bit like sunlight. 

So, will that work for filmmakers?

This first thing to remember is humans have a deep, instinctual
relationship with sunlight. Humans evolved for millions of years with
both sunlight (a far, blue source) and fire (a close, red source) as our
primary light sources, and it’s hard-wired into us to understand how
both work. One of the reasons bad lighting will often look bad is
because it’s trying to imitate a source but not doing it properly. It
causes deep instinctive bells and whistles to go off that tells us
something is wrong.

In one way, this is an amazing set of hacks for a filmmaker. By
analyzing all the important aspects of sunlight and mimicking them, it
should make recreating daylight scenes on a budget easier.

One key to remember is that light will still obey something like the
inverse square law (even lasers have some form of dropoff), where light
drops off faster the closer it is to the source, so we recommend placing
the units as far away from your scene as you can. The inverse square
law is why you can walk up a mountain and the light doesn’t get any
brighter, even though you are getting a mile closer to the sun; because
when you are that far away from the source it doesn’t change much.

But if you walk even 5 feet closer to a bedside lamp it goes much
brighter. Light drops off faster the closer you are to the unit. You’ll
need space to make this gag really work.
Credit: DIY Perks

Where we think this might not work as well for filmmakers is in two
areas, both of which can be overcome in certain circumstances but need
to be thought about.

The first is flexibility. These home-built units just don’t seem durable
enough to continually pack up in your truck, drive to a set, and set
up. If you are building a permanent set in your garage for a YouTube
show and want to have a cool window effect, this could be an amazing
window effect to have shining through your window on a permanent basis.
But moving it around constantly doesn’t seem doable. It could be
interesting if someone wanted to make a direct to factor connection with
a satellite dish manufacturer and convert them to cinema-use builds
with robust mounts and connectors, but the DIY units won’t likely hold
up.

The second, bigger issue is coverage area. Because the light is
collimated, its coverage area will be relatively small. Parallel light
doesn’t spread, after all, making this very spotty. As you can see in
the video, it looks like you’ll need a unit for every single window.
Again, if you are building a permanent set installation we could totally
see putting this up on every window in a “set it and forget it”
fashion, but putting 20 of these on your truck in order to light even
the simplest of location shoots would be a lot of space on the truck.

I do remember in the 80s growing up with our neighbors (we lived in the
woods) having giant satellite dishes that must have been 8 feet across.
We haven’t seen those since the 90s, since satellite tech presumably got
better, but they must be out there somewhere. If one of those could be
purchased used, you could maybe get a pretty wide coverage area out of
it. 

The blue light scattering diffuser is interesting since, at least in
this video, it does clearly affect the light in a way that most paper
diffusers just don’t. Again, for a permanent install, building something
like the aquarium system seems doable, but we would love to see
something more durable, with baby pins to put on a tripod, that we could
stick on the truck and bring with us to set. We would also love to see
more testing to see if there is anything non-liquid we could use to
create a similar effect. While we’re fellow users of black soap, dragging around tanks of liquid would be best avoided if possible, but maybe worth it if not.

We do think it’s a very cool idea, and honestly, we’re tempted to try it
for fun, using a movie light in place of building an LED from scratch.
If it takes off as a concept, we hope someone in the movie space will
make more flexible, reusable systems for both the parabolic reflector
and the blue light scattering diffuser.

As we head into the long winter months continuing to be trapped inside,
if we had space we’d want to build it just so we can have that “summer
morning breakfast” feeling instead of the “winter in a dark tunnel”
breakfast feeling we have as we eat our eggs before the sun comes up.
For that alone, we’re into this video.

One Small Modification Allows This Lens to Create ‘Magic Bokeh’

One Small Modification Allows This Lens to Create ‘Magic Bokeh’

After flipping a single lens element, this Iranian photographer was able to capture the most stunning and unique bokeh.

For filmmakers, bokeh is probably the richest, most decadent type of sweet cinematic treat, but the bokeh that Iranian photographer Alireza Rostami was able to capture with a specially modified vintage lens has taken visual confectionery to a whole new level. How did he manage to pull it off? By reversing one single optical element of a $70 Zenit MC Zenitar 50mm f/2 lens. The bokeh that came out after mounting the lens to his Canon 6D (outfitted with an MFT-to-EF mount adapter) will certainly take your breath away.​

You can view these images and the rest in the series on Rostami’s Instagram account.

Rostami explains to PetaPixel where his interest in optics and lens technology originated.

I am a researcher in the field of photography lenses from Iran, and my country doesn’t have the technology for manufacturing cameras and lenses. I’m motivated to research and discover this technology, so I began studying and collecting information about the history of photographic lenses and, consequently, the use of reverse engineering for camera and lens autopsy.

If you’re interested in seeing how Rostami modified the lens, which I’m assuming all of you are, then check out the video below, in which he goes through his process step by step.

Taking apart a lens and adjusting its elements is definitely an undertaking one needs to have some knowledge of and experience with if they want to be successful. But keep in mind, if you have a desire to learn more about how your lenses’ optics work or just want to try this modification out for yourself, the lens Rostami uses is just $70 (I saw it for as low as $40 on eBay), so it’s not going to be a huge loss if you fudge it all up. I say it’s worth a try!

The Thought Process Behind Lighting an Exterior Shot at Night

Gearing up for an outdoor nighttime shoot? Keep these lighting techniques in mind.

Night exteriors pose unique lighting challenges to cinematographers. Not only do they have to paint light on the blank canvas that is darkness but they also have to mimic the look and feel of the moon, a light source that is often not powerful enough to produce a decent exposure. If you’re unsure of how to approach a nighttime shoot, you should check out this video from Aputure. In it, Ted Sim talks with DP Julia Swain as she details her lighting process and techniques, from how to recreate moonlight to taking advantage of practicals.

Because there aren’t really any hard and fast rules about lighting, not all DPs are going to light a scene in the same way. However, Swain’s three different lighting setups can give you a great primer on exterior night shots, as well as a great place to start your education on how to light them. She demos a “bare moonlight” setup, moonlight with practicals, and finally, just practicals, which introduces you to some of the most common and important concepts in lighting night exteriors.

There are many different things to think about when deciding on how to light these kinds of scenes, but perhaps the biggest concepts and issues to consider are moonlight (its role in the shot and how to recreate it) and practicals (how you can use available lights to your advantage).

Moonlight

If you’ve never recreated moonlight, Swain’s advice is to soften and spread your light to give it a more natural appearance. You can do this by not only bouncing your key light off of a bounce board but also diffusing it through a grid to reduce what Swain calls a “sourcey” look. Also, bouncing light onto a soft bounce will give a nice, even, soft look to your fill light.

Practicals

Swain’s second setup shows you just how intricate and detailed lighting a scene from complete darkness can be. Not only does she use recreated moonlight to illuminate the scene, but she also uses a ton of practicals, including a jacuzzi light, string lights, as well as several studio lights that extend the power of the practicals inside the house. What all of this does is, yes, provides enough brightness to properly expose, but it also gives the scene depth and character. From the background to the foreground, the final shot has so many things to see, but it also successfully sells the illusion that the lighting setup is completely natural.

What are some other tips for lighting scenes at night? Let us know down below.      

5 Things You Should and Shouldn’t Do When Shooting Slow Motion

If you want to shoot better slow motion footage, you might want to consider these dos and don’ts.

When’s the last time you watched a film or video that didn’t have at least a few seconds of slow motion footage? It’s probably been a while (or never), right? Its ubiquity is partly due to how it can instantly give shots a lot of style without much effort, but despite the relative ease of capturing slow-mo, it’s actually even easier to fudge it up. In this video from Filmora, learn about five dos and don’ts of slow motion filmmaking that will help you avoid some of the most common mistakes.

The first thing new filmmakers learn about slow motion filmmaking usually relates to frame rate: the higher your frame rate, the slower your footage will be. So, they go out, set their frame rate to 60 or 120 (or higher), and are surprised when they find lots of issues with their footage, like underexposure and flickering. These issues are both incredibly common and incredibly avoidable if you know a few things about slow motion. Here are the tips mentioned in the video:

  • Adjust your shutter speed: Want to avoid weird artifacts and that weird ghosting effect you get when you shoot slow-mo? Then you’ll need to make sure your shutter speed is twice the inverse of your frame rate. So, if you’re shooting at 60 fps, set your shutter speed at 1/120 (or whatever’s closest), and if you’re shooting at 120 fps, set your shutter speed aaaatttt…1/140 (or whatever’s closest). That’s right!
  • Use enough light:  Now that your shutter speed is a lot faster, less light is going to hit your camera sensor. This means darker images. In order to ensure you can get a proper exposure, make sure you provide enough light for your scene.
  • Be aware of flickering: Okay, you’ve got some lights to properly expose, but…what kinds of lights do you have? Some will appear to “flicker” in playback, a phenomenon known as banding, but there are plenty of flicker-free light sources out there that you can use, or you can calculate your light source’s pulse frequency and camera settings to make sure you won’t produce that ugly strobe effect.
  • Overcranking: When it comes to slow motion, the slower the footage the better, right? Well, not always. Each frame rate setting produces its own unique look, from 24 fps to 1000 fps and beyond. Even if your camera can capture 240 fps, it may 1.) have a lower resolution, and 2.) have an aesthetic that doesn’t work as well as, say, 120 fps does for your project.
  • Overusing slow-mo: Everybody and their judgy Aunt Debbie loves slow-mo, but just like judgy Aunt Debbie, slow-mo is best when it makes an appearance occasionally. If you think you might be overusing it, ask yourself why you think the shot should be in slow-mo, what effect it’ll have on your audience, and whether or not it’s necessary to the story.
  • Use a stabilizer: Slow motion is a great way to hide unsteady footage, but if you did your due diligence and used a stabilizer, not only are you an overachiever but your footage is going to look milky silky smooth.
  • Use music: Footage captured in slow motion either doesn’t record audio or records distorted and unusable audio. So, be prepared to have some sweet tracks on deck to fill the silence.
  • Testing: Before you go out and actually capture your slow motion shots, you might want to do a few tests first. Make sure your lighting is sufficient, that there isn’t any banding, and, of course, that your focus is on point.
  • Speed ramping: To add a little flair to your edit, you can try a *cough* tragically overused *cough* editing technique called “speed ramping,” in which the speed of your footage changes between different frame rates. Typically, editors will have a clip play at 24 fps and then slow it down to 120 or 240 fps during a big moment, like somebody pulling off a sweet kickflip or something. (Peter McKinnon has a great tutorial on how to pull off speed ramping.)
  • Break the rules: You’re the boss of your own life and if you want to throw away all of these tips and try new things and be a friggin’ rockstar, then you do it, my love! Please experiment with slow-mo and discover stuff so the rest of us can play around with a cool new effect.

Netflix Swoops in to Finance the Completion of Orson Welles’ Final Film

Orson Welles - F for Fake
The streaming behemoth will distribute Welles’ ‘The Other Side of the Wind’ after editing has been completed based on the director’s notes.

Almost 2,900 backers stepped up to fund an Indiegogo campaign launched in May 2015 to complete Orson Welles’ final film, The Other Side of the Wind. Although the campaign raised over $400,000, that amount fell well short of the campaign’s revised goal of $1 million (down from the original $2 million). Even with producers Frank Marshall and Peter Bogdonovich on board, the crowdfunding campaign wasn’t able to get the film across the finish line.

Since the campaign, Marshall, Bogdonovich and fellow producer Filip Jan Rymsza have been relatively quiet about the project, although rumors started almost a year ago that Netflix was circling the film with the possibility of also creating a full-length documentary about the making of the film.

Now, Netflix has officially announced that the company has picked up the rights to The Other Side of the Wind, and will provide financing to complete the edit. Marshall served as line producer on the film in the 1970s, and Bogdonovich appears in the film, so these two filmmakers have personal stakes to finish this film beyond their admiration for Welles.

“Like so many others who grew up worshipping the craft and vision of Orson Welles, this is a dream come true,” said Ted Sarandos, Netflix Chief Content Officer, in a statement released by the company. “The promise of being able to bring to the world this unfinished work of Welles with his true artistic intention intact, is a point of pride for me and for Netflix. Cinephiles and film enthusiasts around the world will experience the magic of Orson Welles once again or for the very first time.”

Marshall is a little beside himself with the realization of this news. “I can’t quite believe it, but after 40 years of trying, I am so very grateful for the passion and perseverance from Netflix that has enabled us to, at long last, finally get into the cutting room to finish Orson’s last picture,” said Marshall in the statement.

Film negatives have been shipped from Paris to Los Angeles for scanning, and editing will adhere to notes that Welles left behind in several notebooks. Not surprisingly, Netflix has not announced a release date, so stay tuned to find out when you can see Welles’ last film.

4 Cinematography Tricks for Shooting Beauty

As a cinematographer, how can you make your subject’s beauty really pop?

Fashion and beauty photography/cinematography is big business, so it’d do you good to learn some tricks of the trade that’ll help you really capture the beauty of your subjects. In the video below, Director/DP Matthew Rosen shares his approach to shooting beauty, including how to light a scene and how to achieve gorgeous visual effects in-camera that’ll make your subject really stand out. Check it out below:

Beauty is in the eye of the beholder, even when you’re a cinematographer. There are countless ways to capture “beauty,” but Rosen’s approach is what many would consider to be more traditional: soft, even lighting, delicate flares, etc.

So if that’s what you’re after, here are the four tricks he mentions in the video:

  • Lighting: Rosen uses a single backlight and two bounces on either side of his subject. This produces a hair light, as well as nice, even lighting on the subject’s face.
  • Eye light: Eye lights are crucial in beauty photography/cinematography, because, duh, eyes are beautiful and can express a lot of emotion, so you really need to ensure that you capture that in your subject. Here’s a tutorial dedicated to showing you how to master the eye light.
Rosen’s setup for creating flares in-camera
  • Flares: This technique gets kind of a bad rap because of its overuse (thanks J.J.), but if used sparingly and intentionally, flares can give your shot that delicate softness you’re looking for. Rosen creates his traveling flares in-camera using a “flashing” technique. If you set up a row of lights and move them along a track with finger flags that cut the light intermittently, you will get these kinds of flares.
  • Vignette: Creating a vignette can certainly be done in post, but if you want to do it in-camera, Rosen uses different kinds of glass objects set in front of the camera to pull off the effect.

10 Things to Think about When Choosing the Right LED for Your Project

Choosing the Right LED

This will help take the guesswork out of buying LEDs.

If you don’t know much about lighting, shopping around for LEDs might seem like an exercise in futility, because you don’t really know what to look for (or look out for). But Caleb Pike of DSLR Video Shooter shares 10 tips in the video below on what to look for in an LED lighting unit, from price to brightness and everything in between.

So, here are the things Pike says you should consider before purchasing an LED:

  • Your budget
  • How do you plan on using your LEDs?
  • Output/luminance (the number of LED bulbs/chips/diodes doesn’t necessarily determine the light’s output)
  • CRI (the higher the better)
  • Color temperature
  • Power options (Does it only run on batteries or can it be plugged in?)
  • Beam angle
  • Multi-chip or single-chip?
  • Edge color distortion
  • Extra features (LCD screens, battery life indicators, bi-color, dimmers, etc.)

Now that you know what to look for, Pike shares a bunch of LED lights that you might want to consider.

2016 was a lot of things, but it was a fantastic year for cinema in Hollywood

Dear 2016, Thanks for the Great Films

2016 has been an interesting year, especially for movies.

It’s finally here, the last day of 2016! While some of us may celebrate with shots and chanting “Ding dong, the witch is dead,” some may find it appropriate to look back on a truly spectacular year in films, especially those coming from the indie sector. Inevitably, video essayists and casual videomakers, like Max Shishkin, Fernando Andrés, and Ben Zuk, have created end-of-year supercuts and mashups of all of 2016’s films, so, we chose a few of our favorites as a fitting tribute to a year that we hate to see go, but love to watch leave.

It’s heartening to see filmmakers in 2016 continuing to push boundaries and take chances with their projects. Barry Jenkins told a story most feared to tell in Moonlight, the Daniels managed to sell a film about a farting corpse, and Nicolas Winding Refn and DP Natasha Braier showed us some of the most spectacular cinematography in Neon Demon. Hopefully 2017 will show us the same spirit.

What were your favorite films of 2016?


See a 2016 Year-in-Review coverage.

Is Wedding Video A Must or a Maybe?

The Knot

Before we got into filming weddings, we had the same connotations of this industry as the next person. My most vivid memory was at a friend’s wedding where I was witness to the stereotypical video dude with the giant shoulder cam, on-camera light, and cables hanging every which way. He was paid to stand in the back of the room and record every second from start to finish.

My first thought was, “are they even going to watch this?”

So, is it Necessary?

To answer the question, I’ll be completely honest. No, a wedding videographer is not necessary. Gasp!

It must be strange hearing that, seeing as this is what we do for a living. The truth is though, having a keepsake like a wedding film just isn’t a priority for everyone. You may be more focused on creating a truly magical evening for yourselves and for your guests, or maybe you want to spend extra effort on organizing an amazing cart of delicious treats for your foodies in the crowd.

If that’s the case, you’re probably less likely to be as concerned with capturing memories as you are in experiencing them with everyone. That’s quite alright, because everyone is different, and we all have our priorities.

Should You Hire a Videographer?

One of the biggest regrets I hear from brides is that they didn’t hire a wedding videographer. Sure sure, I’m biased, but take a look at this article, “Not Hiring a Wedding Videographer is a Bride’s Biggest Regret” or this one, “…Big Mistake. Big. HUGE.”

“How did I move in my dress? How did I sound saying my vows? What words did I actually say? … Yep, my main regret is not having any moving footage of my day.”   -Becky, Rock My Wedding

The fact is, it’s next to impossible for you to remember all of the little details, and even some of the big ones that happened that day. In talking with a potential client the other week, I asked them, “Why is having a wedding film important to you?” His answer made total sense and it was pretty refreshing to know that what we do clicks with our fans. He said that after watching our films, he felt as though he knew these people.

“Watching them was an experience, it was immersive.”

Our goal when producing a wedding film is to make it as emotionally engaging as humanly possible. This is what we strive for each and every time. Visit our brendandayfilms Samples section to see some examples.

In Summary

If you’re on the fence about it, or you’re not sure you want to spend the money, I would definitely still recommend it. Try looking at it like an insurance policy. You may not watch it all the time, but it’s there if you need it.

A beautiful and professional photo can do wonders, but it won’t let you listen to your own voice reciting your vows. It won’t bring you back into the conversation you were having with your bridesmaids as you got your hair and makeup done together. It won’t let you hear the exchanges between your grandparents and parents during cocktail hour.

A film will do that.

You may be thinking wedding photos and a video are overkill, but trust us, you will want both. Don’t just take our word for it — listen to feedback from these Knotties.

“The only regret I have about our wedding is not having a videographer. The day goes by so quickly — you really miss so much of it. I look back now and wish I would have spent the money for it.” -Vicky Harrison

“I was really worried that I might regret not having a videographer — not only to capture my fiance and me, but mostly our family members. I know it’s kind of morbid, but I know they won’t be around forever and I wanted to capture their voices and mannerisms.”

rmfriedman

“While we are very pleased with our photographer, I’m now starting to have second thoughts about not having a videographer. I guess there’s nothing like having a video to capture the details, people’s faces/expressions, our vows — things that I might miss during the day as a busy bride and that don’t necessarily get captured in even the best quality photos.”

caramels03

“DO IT!!!!! I promise you will not regret spending the money. You may not think you want to relive every minute, but after the day you have been meticulously planning for months flies by in what feels like seconds, you will be desperate for a way to remember it!”

rachaelj99

“I just got married in June, and we had both a photographer and a videographer. I am so, so, so thankful that we ended up going with the video. It was something we almost cut to save money, but it was so worth it! When we got the pictures back, there were many guests and moments that were missed — and thankfully were caught by the video. I hate being videotaped, but I never even noticed him throughout the day.”

megc2

“I’m definitely planning on hiring a videographer. I want to be able to see fiance’s and my expressions when we say our vows. I want to be able to hear how we say them — and I just want to see everyone have a ball at our reception. And come 40 years from now when DVDs and blu-rays are old-school, I still want to be able to watch us on our big day.”

“I did not think I would be so excited to watch our wedding video, but the day went by so quickly! I want to see our ceremony and cocktail hour, which I missed. Though I may only watch it a few times, I think it was worth the money.”

foozzle

Fill Out the Form Below for more information on all of our services.

Cheers!

Your Name (required)

Your Email (required)

Date and Location of your Event

Information about your wedding

captcha
please fill in the captcha section

HDR Vs. Flash For Interiors And Real Estate Photography


I know that many of our readers are real estate photographers or have at least tried their hand at real estate photography. The most common method used to create ‘good enough’ real estate photos is HDR: whether it is tonemapping or exposure fusion, HDR is definitely the most-used method for real estate and beginner interior photographers. In this post, I’ll do a comparison between tonemapping, exposure fusion, single on-camera flash, and multiple off-camera flash, and show you the benefits (or disadvantages, rather) of each.

I’ve been shooting and writing about architecture, interiors, real estate, and generally everything that needs to look pretty but cannot be moved for awhile now, and it seems every time I post an article related to my field(s), there are plenty of comments debating the use of HDR and the use of flash in the comments. Flash users insult HDR users, HDR users insult flash users, everyone cuts a knee open, and everyone goes home disappointed. It is as dependable as the sun rising and setting – I honestly cannot remember any time when it hasn’t happened.

So on a recent shoot, I was presented with a perfect scene to demonstrate the differences between methods, and (here’s the important part) remembered to shoot it with this article in mind. I bracketed for HDR, shot for the highlights, the shadows, shot with flashes, shot with flashes again, and then moved the flashes around and shot again, just because I wanted to leave no stone unturned.

So let’s get to it, shall we? I know this is real edge-of-your-seat entertainment, so hold on tight.

The Scene

Let’s get a feel for what we’ll be working with. I was recently contacted to shoot this neat apartment in Westwood, Los Angeles, CA for a client of mine. Now here’s the fun part: I had an hour to create 10 images. That hour included unloading a huge Pelican case, scouting it, chit-chatting with the client to exchange ideas, and shooting it. I managed to finish early which allowed me to set up my little test and spend ten or so minutes on just this scene.

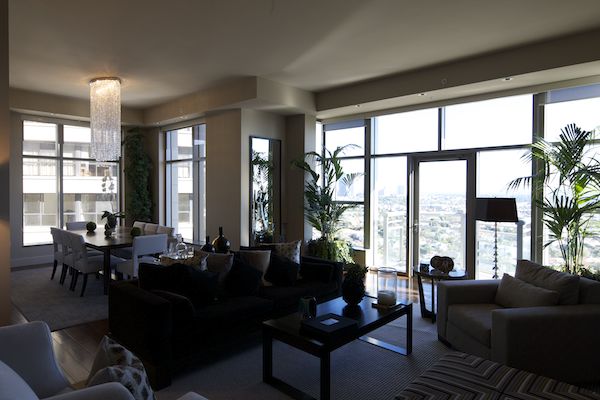
Here is a single exposure of the scene as my camera sees it. I dropped it on a tripod, spun the dials until the exposure meter was centered, and clicked off a frame. This is what resulted:

It’s about 2pm and sunlight is streaming in those floor-to-ceiling windows like crazy. No camera would be able to capture the deepest darks of that couch and the brightest brights of the exterior in one image in these shooting conditions. I’d bet my business on it.

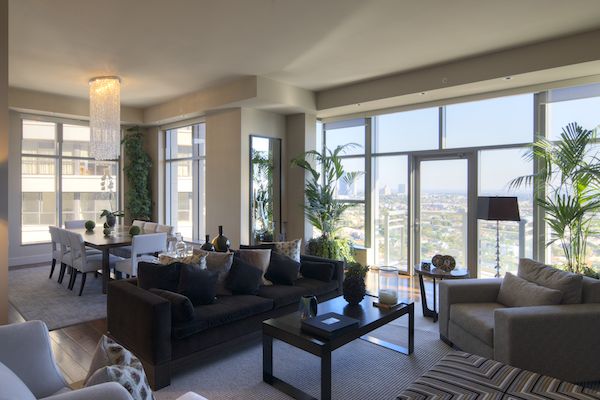
If you’re familiar with the LA, or any other high-end real estate market, you’re well aware that the view here probably cost multiple millions of dollars, and letting it blow out isn’t going to make anyone very pleased with the photos. So we’ll need to make sure that we expose both the darkest darks and the brightest brights properly. Sure, we can just expose for the windows, but we’ll get something that looks like this:

And for obvious reasons, we can’t deliver that, either. We can expose for the interior:

Which might be deliverable depending on the circumstances, but really, it’s quite far from anything that I would even consider delivering. This would at least be useful as a scouting photo, but it still fails to accomplish what we’re being paid to do: to show off the interior and exterior views of this gorgeous apartment.

So in order to show off this space in the best possible way, we’ve got a couple options. Let’s start off with…

Tonemapped HDR

Loved by many, vocally hated by just as many, and used by everyone at least once in their careers, Tonemapped HDR is certainly one way to go about things. Tonemapping is what most people think of when the phrase ‘HDR’ is mentioned: those radioactive landscape scenes and, um, “artistic” renderings of city scenes are some popular applications for tonemapping:

Apologies to all Tomcat lovers around the world for that one. Usually, tonemapped HDRs are created by shooting three or five exposures spaced one or two stops apart, which are then merged together using a program like Photomatix. Using tonemapping can create some passable results, but the images quickly fall apart under scrutiny or enlargement. Here are the three images I used to create my tonemapped interior shot. One is, according to the camera, two stops underexposed, one is properly exposed, and one is two stops overexposed. In other words, a typical, run-of-the-mill application of HDR.

And after loading the three images into the Photomatix engine and playing with the result, this is what I was able to come up with:

At first glance, it’s not the worst thing in the world. We’ve got details out the window, details in the interior, and we can tell what’s going on. I guess if you were being paid $100 and the client expected you to shoot with a potato, you’d be in the clear. But upon further inspection, things really start to fall apart. The sky is a muddy mess with clipping everywhere, and there’s no real saturation or crispness due to the overexposed frame being entirely blown out in that area. The colors in the interior are incorrect (especially from the lights – tonemapping loves to oversaturate warm colors) and the transition between the interior and exterior around the windows is a bit rough. The shadow noise is also a bit unruly at 100%, but like I said, it’s not the absolute worst real estate marketing photo ever. I also spent way too much time massaging it in post to get it to look like this, and I can imagine that it’s very easy to screw something like this up if you aren’t very familiar with Photomatix’s controls.

Exposure Fusion HDR

Another popular method for photographing interiors is to use Photomatix’s Exposure Fusion program. This (in very unscientific terms) uses a different blending algorithm to create a more natural result, but at the expense of creative control, which may actually be a good thing. Exposure fusion averages the exposure across the scenes and takes bits and pieces from each exposure to create a more life-like image. Using the same base exposures, I was able to come up with this:

Which is a decent improvement from our tonemapped shot. Still, there are a number of issues with this shot. Try as I might, I wasn’t able to pull out the window view to get it to look the way it really should (well-exposed, good visibility) for a property like this. I could split a few more hairs, as well: the contrast in the scene isn’t really what I’d call ideal, and it’s kind of muddy overall. It doesn’t really scream “this is a high-quality, sharp, snappy marketing image that I’d want to print out for a magazine article to sell my expensive piece of real estate.”

Again, I spent some time in Photomatix pulling and pushing the sliders to get this to look as best as I could. If you were really devoted, you could bring this into photoshop and replace the exterior scene with a properly exposed one. But unless you’re getting paid a significant amount, it’s just not worth the time to mask out all of those details or pull out your hair dragging the pen tool around the screen for thirty minutes to do so. As Sweet Brown would say, “nobody has enough time for that.”

A deliverable shot, to be sure, given the right budget and client. But as I said, there is a lot of room for improvement. So let’s try another method: the flash.

On-Camera Flash

The single on-camera flash is another approach to this type of photography that I frequently see being used, oftentimes with utterly disastrous results. There are times where it can be perfect, however: in small rooms with white walls and big windows, a little kiss of light from an on-camera flash can really help to fill things in and add some sparkle to run-n-gun real estate photography. But in a challenging situation like the one we are faced with in this post, well, I’ll let you be the judge:

Okay. So it’s a Xerox, essentially. All of the information is there, presented in a very ugly format. But it’s there. There’s some light on the scene, you can see what’s going on, but…dang! That window is still long gone. My flash is already at full power, ISO 320, f8, 1/80th, bounced right into the ceiling. I’m letting some of the ambient light from outside fill in the scene to add some natural light and fill. But I really want to see that view, so what do I do? I bump up my shutter speed, which effectively puts me right at the edge of my sync speed and also kills all of the ambient light’s filling effect. Which gives us this:

So there’s our view, but we have completely destroyed any sense of ambience in the interior. Gorgeous, eh? Keep in mind that the flash is on full power here. That is one dark interior, and I can’t go any higher on my shutter speed or I’d cross the sync speed and lose a significant amount of flash power. I could bump my ISO or open up my aperture to increase my flash power, but again, I can’t make my shutter speed any faster because of the sync speed limits, and that would negate all of the gains granted to me by bumping the ISO and changing the aperture.

That light, though…is just…so…ugly. Yuck! How can we improve it? By using…

Multiple Off-Camera Flashes

Keep in mind that I had an hour to create ten images (plus details and vignettes, which I shoot with a prime lens, hand-held usually) for a client that called me at the last minute of the eleventh hour. This was a great client, so I wasn’t going to say no, and I was compensated fairly for my time and expertise. Yet I still wanted to create the best results possible given the time constraints, without resorting to HDR or shooting single exposures.

On my usual and ideal gigs, I usually shoot eight to ten images per day using multiple off-camera lights, and, often enough, I have an assistant helping out to speed things up. As you can imagine, I wasn’t able to spend that much time on each image here (2-3 minutes at most). But I think that the results speak for themselves: the window view is crystal clear, the interior looks relatively natural, the colors are all correct, and the shadows and transitions are natural and smooth, unlike all of the other methods I’ve touched on. I will admit that I cheated a bit here: I had to crop out the edges of a pair of umbrellas and crop down from the top of the frame to conceal a minor hotspot. I pulled some shadows and pushed some highlights in Aperture, and of course added the usual contrast and saturation. In reality, I spent no more time in Photoshop/Aperture caressing this image than I did on the HDR images. All things considered, however, the minor cropping and ‘cheating’ here produces a much better result:

Of course, it’s going to take time to be able to effectively light a dark interior in a way that captures every necessary piece of information in order to entice potential buyers. It’s not an overnight solution, and there is always room for improvement. I’m not 100% happy with the quality of light that I created in my final image here, but I spent all of ten minutes on this scene for results that, to me, appear to be the clear winner in the quality and deliverability categories. If I had more time I’d love to play with the composition, different lighting setups, using scrims and cookies, and all of that fun stuff to make a really killer image. I might even kick around for a few hours until the sun started to set to get an amazing twilight shot, but alas, I did not have that liberty on this shoot.

Conclusions

Four methods, all of them producing unique results. Do I believe that HDR and on-camera flash have their place? Absolutely. If you are just starting out, it might help to ease into interiors and real estate photography by using HDR to learn how to compose, get comfortable with the dynamic range and limitations of your camera, and realize how they can be improved. From there, slap a single flash in the hotshoe and master that. It might be ugly for awhile, but it will only get better in time. From there, I’d suggest making the jump to off-camera lighting. Can you create great images using HDR and exposure fusion or other methods that I haven’t mentioned here (for example, manual blending in Photoshop)? Yes, and people do. I may or may not think that those people might be insane due to the amount of time they end up spending in post, but they do. I also enjoy the fine control I can have over a scene when I am the one who is creating the light and mood, rather than being the one who is trying to work within a set of boundaries imposed on me by the scene. The more control I have, the better, but that is another article for another time.

If you’re on a time limit and don’t feel comfortable juggling five or more speedlights, then by all means get familiar with HDR and its Exposure Fusion engine. You’ll need to know the limitations of the program and what kind of scenes it will struggle with, such as the one in this post. But don’t let me mislead you: there are many situations in which HDR can be applied and used to great effect, it’s just that there are some situations where it definitely would not be my first choice.

Everyone has their preferences, and I’ve tried to lay out each method in an unbiased format so you can make your own decisions about how you shoot your interiors or real estate photography. But for me, when it comes to quality, my time, and pleasing my clients, it’s off-camera flash every time. Do note that architectural and commercial photography differs greatly from real estate photography, and a bit beyond the scope of this article.

Here’s a side by side comparison of HDR and Flash, to wrap things up. Note the snappy contrast, which was only bumped the slightest bit in Aperture. The lack of bloom around the windows, the smooth transitions, controlled dynamics and life-like colors of the flashed version when compared to the HDR version.

If you would like to see more of my work using off-camera lighting techniques for real estate, architecture and interiors, head on over to my website at mpkelley.com or check out the strobist article detailing some more of my techniques and work. Those should give you a good idea of just what is possible with lights when it comes to shooting this genre of photography.